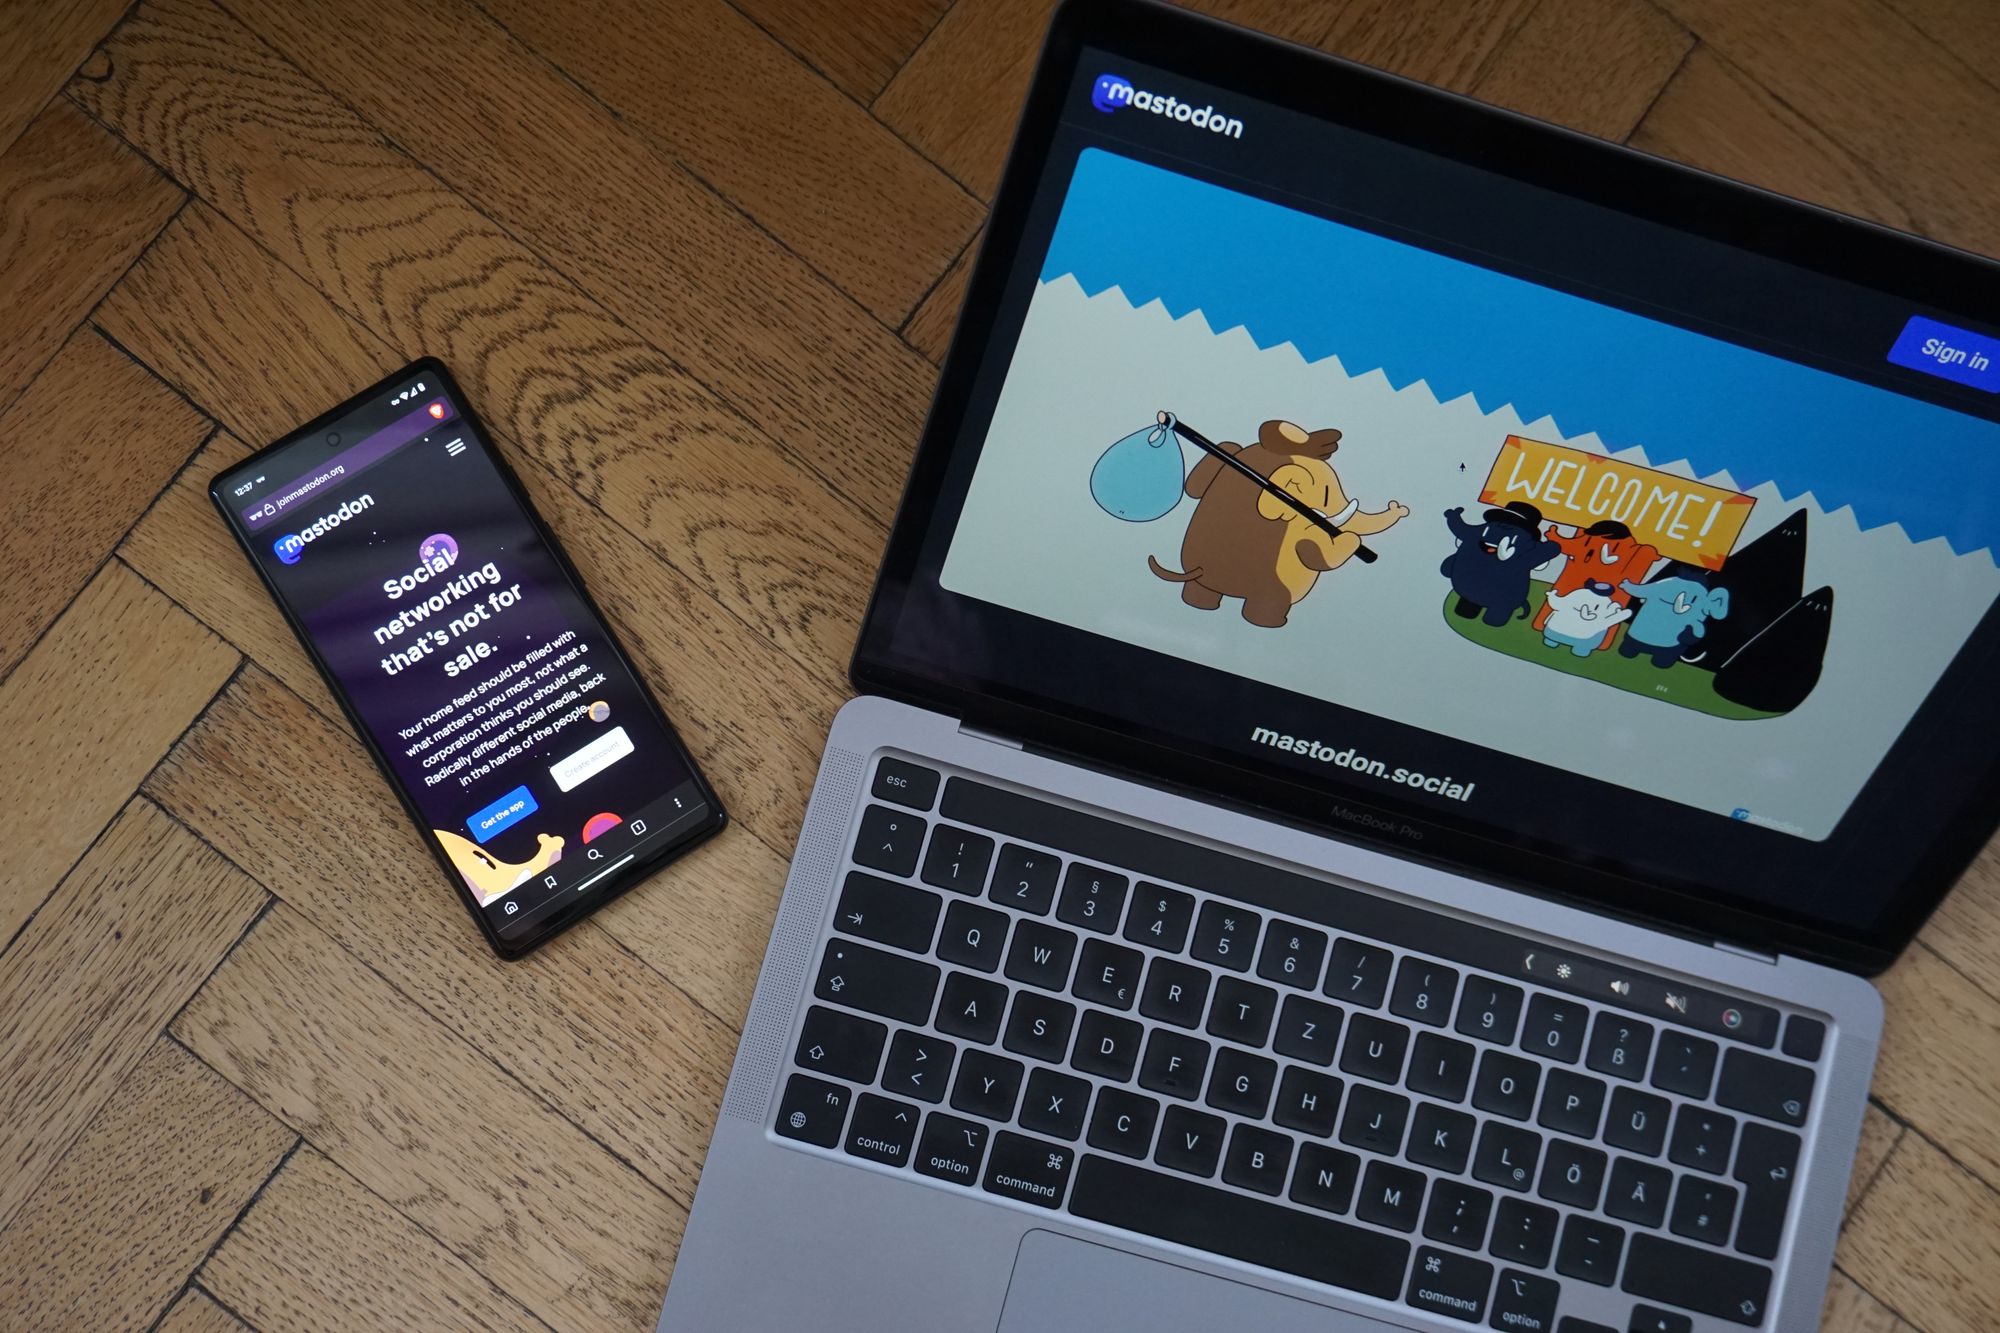
If you are joining Mastodon for the first time, you may have some questions about how to use the platform, what the shiny buttons do, etc. This page has everything that you need to get started.
⁉️
Missing or incorrect information? A feature that should be covered in this guide? Let me know @padraig@mastodon.ie
👆
UPDATED 2024-01-12: Added a index.
UPDATED 2024-10-28: Updated screenshots for Mastodon 4.3.0. Also fixed some broken images after Ghost to WordPress migration.
Index
Creating your account
Well, before you can read this guide, you are going to need an account. Now, you may think that going to joinmastodon.org and signing up would be the play, but it is not.
With Mastodon or the entire Fediverse for that matter, there is no one central server (like Twitter/X, Facebook or Instagram)
This is known as Federation. A more detailed explanation is given in the Federation section towards the end of this post.
But the best way to explain it is:
💡
Think of it like email.
You have a @gmail.com account, but someone has an @outlook.com email address.
You can send and receive emails to and from each other already.
Same concept!
I recommend going FediDB and choosing a smaller server. You may think that joining a large server like mastodon.social (m.s going forward) or mastodon.cloud with lots of people would matter. It does not matter. You can still get the same experience if you join a server with 100 users or 10,000 users.
The benefit with a smaller server is you can form a better relationship with others and depending on the owner/team that is on it, you will find better moderation compared to m.s.
Go to the server of your choice, and sign up (If it’s open for registration)
If you are planning to follow users on Threads (which is owned by Meta, the same company that owns Facebook & Instagram), you might want to see if the server that you are sigining up to has it blocked. More information in the FAQ.
Fill in the details and take note of your ‘username’, which is going to be the address that you can share with people or link on your website. @username@server.com

Congratulations! 🎉
You created a Mastodon account. Let’s get you started!
Customising your profile
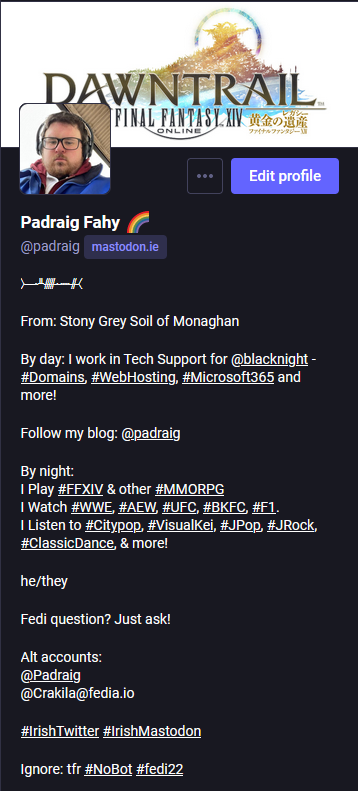
Customising your own profile couldn’t be simpler and should be the first thing that you do when you create your account.
Add a profile picture, header image and a description of who you are.
🤖
Did you know?: Adding #NoBot to your bio means that relay/follow bots do not follow you. While there is no ruling on this or preventing any bot or person from following you, it’s generally respected by developers.
You are also given the ability to add some links to your website.
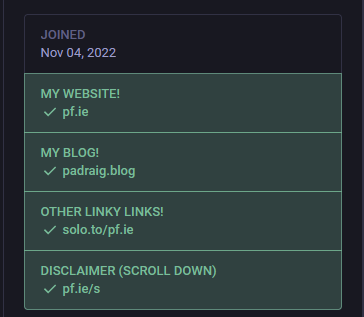
How do you get the green box and the tick? Quite easy, actually. On your website, you will want to link to your website but add a rel="me".
<a rel="me" href="https://mastodon.ie/@padraig">Mastodon</a>If you do not have the ability to add a link but have access to the <head> header scripts, you can add the following:
<link rel="me" href="https://mastodon.ie/@padraig"/>Feeds
- There are 3 main feeds. Home, Explore and Live Feeds.
- Home – This contains all the public posts from everyone that you follow in chronological order (Newest posts at the top). This also includes #hashtags that you follow.
- Explore – This contains public posts that are currently popular from users who are connected to the server. There are also different tabs for popular #hashtags, users and news.
- Live Feeds – This contains 3 tabs:
- This server – These would be all the public posts on the server that you are on. This was called “Local” until Mastodon 4.2.0 release.
- Other Servers – These are public posts from accounts on other servers which are connected to your server. This was called “Federated” until Mastodon 4.2.0 release.
- All – This is a combination of both This server and Other Servers feeds.
Understanding a post.
This is a post. It contains their name, their Fediverse address, post privacy, time, text, pictures (or videos), hashtags and action buttons.
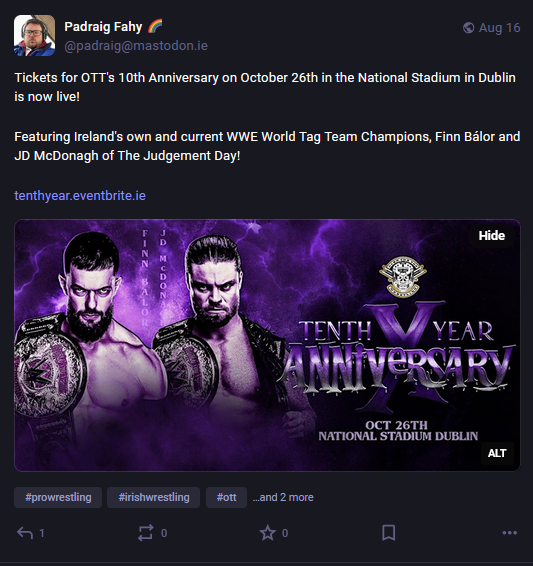

From Left-to-Right:
- The user’s avatar
- The name of the user
- The full Fediverse address
- If you do not see the bit after the username (EG:
@mastodon.ie) then that means that the user is on the same server as you.
- If you do not see the bit after the username (EG:
- The privacy setting 🌎 [This will be explained more in-depth in ‘Privacy Options’ below]
- How long ago they posted.
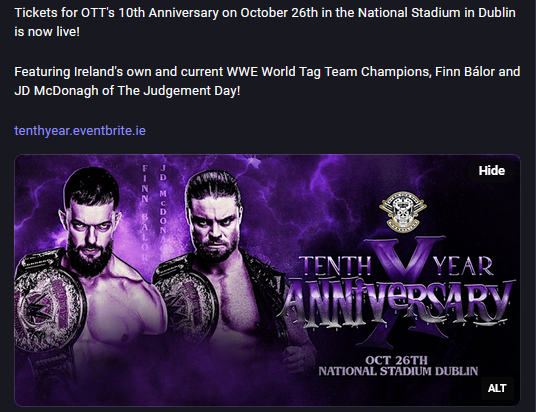
The post text and the image. An “Hide” option can be seen in the top right of the image which can be used to ‘blur’ the image should you no longer wish to see it.

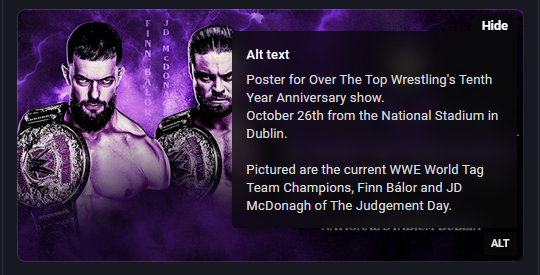
Images may contain an ALT tag on the bottom-right of an image. If you click on the ALT, a tooltip will pop up describing the image. This can be helpful for the visually impaired, or users who use a screen reader.

Underneath the media will be hashtags (If any are used), it will show a couple but you can click on “…and <x> more” to reveal the rest.

From Left-to-Right:
- The ‘Reply’ button and the number of replies.
- The ‘Boost’ button reposts the post to your feed.
- The ‘Favourite’ button alerts the user that you like the post.**
- The ‘Bookmark’ button allows you to store the post in your own private feed for you to come back to in the future.
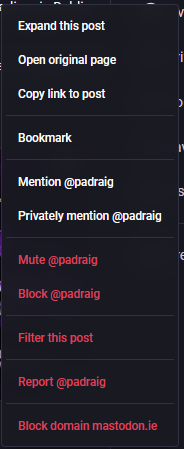
- With the menu button on the far right, you will find various options:
First Follows
As a new user, you are probably wondering who to follow and what to post.
- Check out posts that are in your ‘Live Feeds’ > ‘This Server’ feed to see if anyone catches your eye.
- You can browse the ‘Profile Directories’ to find random accounts.
- Always share your full address if you are mentioning your Mastodon account. EG:
@padraig– This only applies if the user that you are telling Mastodon about is on the same server as you. The best way to share your address would be the full address. EG:@padraig@mastodon.ie - If you are given an address, you can use the Search function to find the account. Either
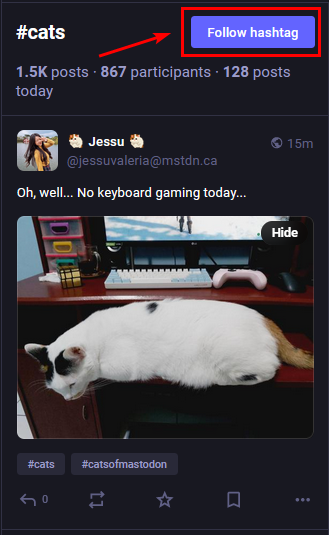
@padraig@mastodon.ieorhttps://mastodon.ie/@padraigwould work. - You can also follow hashtags in the same way that you can follow users. Search for the hashtag and click the Follow hashtag button. These appear in the ‘Home’ feed. In Advanced View on the web browser, you can ‘Pin’ the timeline as a column.
Lists
You can create your own custom feed with accounts that you wish to have in your own tailored feed. You could add in your work colleagues, tech journalists, meme accounts or local friends. Like hashtag columns, you can pin them in ‘Advanced View’.
To create a list, go to a user’s profile and click on the ⋮ menu, choose ‘Add or Remove from lists’. You can choose to add the user to an existing one, or you can create a new list.
In ‘Advanced View’, you can edit the column to only show replies to other people in the list or to anyone.
Composing a post.
You have created your account, and now you want to post. Great. Let’s have a look at the composer:
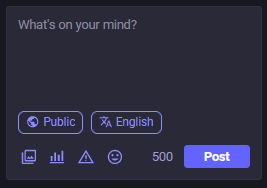
- At the top, you can enter your text content. On Mastodon, you have 500 characters to compose your post. Other services may have a higher or lower character limit.
- If you add a URL to a post, it will only use 23 characters rather than the total characters of the URL. This is something that is carried over from Twitter and basically eliminates the use of services like Bit.ly or tinyurl.com.
- [🌎Public] – This opton is for Privacy Settings. See ‘Privacy Options’ below for more information.
- [文A English] – This is for the language. Users may set the language of their post to a different language, and this is an indicator to show that the post was created in a different language. The default is English. Support of this feature is dependent on the server.
- At the bottom, you will find 4 options.
- The first option is for media. This allows you to attach up to 4 images, 1 video or 1 piece of audio (you cannot mix and match)
- The second option is for polls. Polls can have anywhere from 2 to 4 options. You can set a timer as to how long the poll will run. The time starts when you ‘Publish’ the post. Users who vote in the poll will get a notification when the poll ends with the results.
- NOTE: You cannot use attachments when using polls.
- The third option is for CW – This is ‘Content Warning’ or ‘Content Wrap’ – This allows you to set a title for the post and users will have a choice to expand the post in order to view all the text. Images/videos that are uploaded while using this feature will automatically be blurred. See ‘Content Warning’ below for more information.
- The fourth option is the Emojis and custom emoticons (which can only be used by users on your server but can be seen by anyone) selector.
- Here, you will also see how many characters you have left and the “Post” button.
If you want to create a thread of posts, all you have to do is reply to yourself with the next post. Unlike Twitter, you cannot create a multi-post thread and submitting the lot in one job lot. It may be possible to do this on different clients, but on Phanpy, Ivory and Mona, it is not possible to do this.
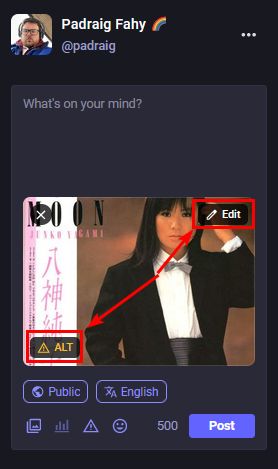
Remember earlier when I mentioned the ALT tag on an image? When uploading images or videos, it is important to add AltText – AltText describes the image or video to users who may be hard of seeing or hard of hearing. Users who may have eyesight issues may be using a screen recorder to read out what is on-screen. While it is not mandatory, it is considered ‘good practice’ to add it.
To add AltText, attach an image/video/GIF to a post, click on either ‘Edit’ or the ‘⚠️ALT’ that appears.
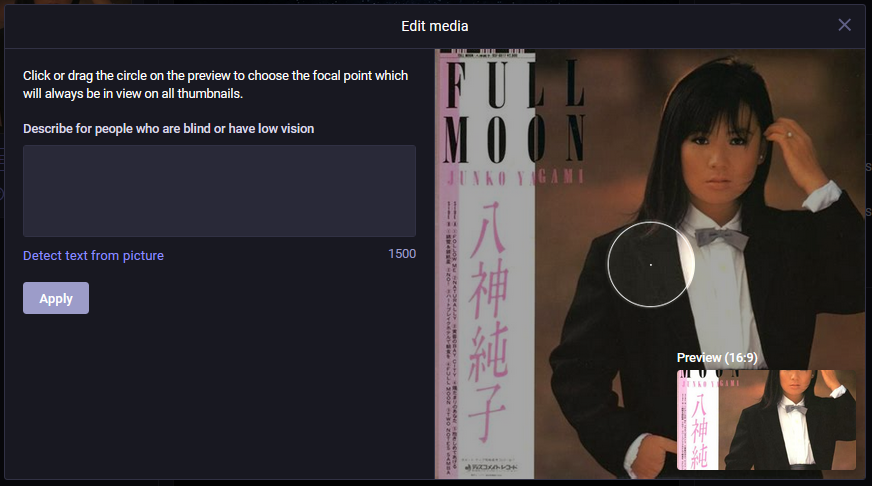
Here, you can now enter the AltText. If your image has prominently text, you can click the “Detect text from picture” option, and it will scan the image for text. Sometimes the detection can be wonky, so verify the text before clicking ‘Apply’.
#
Not sure what to post? How about an #introduction!
A great way to attract new followers when starting out is to do an #introduction post – The #introduction hashtag has become a tradition for all new users and gives other users a synopsis as to who you are.
Utilise hashtags for topics that you are interested in such as #cats, #technology, #politics and more. The more hashtags, the merrier.
Remember to ‘Pin’ 📌your post so people who come across your profile have an idea as to who you are. Consider the #introduction post an extension of your bio.
Editing a post
Did you post something and you either made a spelling mistake or forgot to add something? Don’t worry, you can edit your post for free.
Once the post is live, click on the … menu beside your post and click on ‘Edit’. This will allow you to make edits to the text. The history of the edits can be viewed by clicking the pencil icon once it has been edited at least once.
Anyone who has interacted with your post prior to the edit (whether they favourited, replied, voted in your poll, etc) will get notified that the post has been edited.
If you forgot to attach media, or you feel that it is worth a redo, click on the … menu and choose ‘Delete & Re-draft’ which will copy the post back into the editor, ready to go again.
Additionally, you can edit the post and add AltText to images and videos in case you forget.
There is no time limit or the number of times you can edit a post.
💡
Did you know? You can pin up to 5 posts at any one time!*
Privacy Options.
Clicking the 🌎 when composing a post will show 4 options.
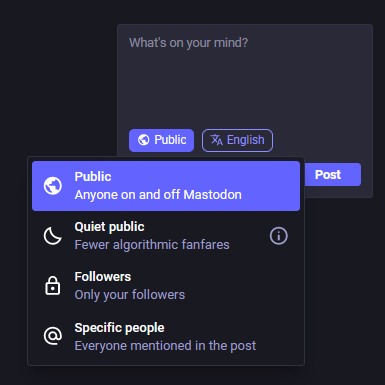
- Public – Self-explanatory – The post will appear everywhere.
- Quiet Public – The (i) gives a handy description as to what this is: “This behaves exactly like public, except the post will not appear in live feeds or hashtags, explore, or Mastodon search, even if you are opted-in account-wide.” If someone goes to your profile directly, they would be able to see it. [This was called Unlisted prior to Mastodon 4.3.0]
- Followers – The post will only be visible to people following you. [This has been slightly renamed from Followers Only to Followers in Mastodon 4.3.0]
- Specific People – Only the accounts that you mention in the post will see it. This should not be treated as a ‘DM’ or ‘Private Messaging’ system. Use a messaging app like Signal or Telegram for that. This used to be called “Mentioned People Only” prior to Mastodon 4.2.0
If you reply to a post that has a privacy setting chosen, it will honour that option. You can change the privacy of the post, but you should aim to respect the privacy option that is in place.
CW – Content Warning
Content Warning (or Wrap) is a function that you can enable on your post. It is a hotly debated topic within Mastodon about how it should be used and whether certain topics should exclusively be used within Content Warning. There is a loose set of ‘rules’ as to what should be placed behind a Content Warning.
Some examples of topics are:
- Politics (Regardless of stance)
- Current Events (i.e. War in Ukraine, Uprisings and other major events)
- Spoilers for TV Shows, Movies, Games or Books.
- or simply a long post that you wish to wrap content in…
If you are unsure whether something should be in a Content Warning, seek out your Server Admin and ask them before posting. Additionally, seeing what other people do in the ‘Local’ feed will give you an indication.
Something that I personally try and do is add (+) or (-) where applicable to the subject of the Content Warning to let the user know if the post is positive or negative.
Here is what a post with a Content Warning looks like:
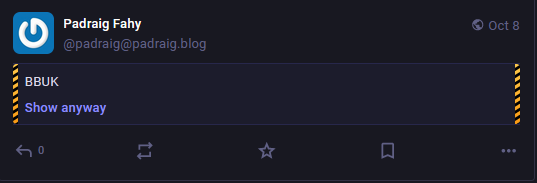
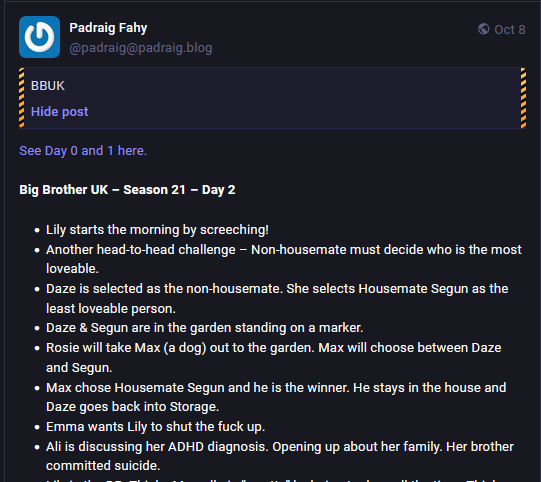
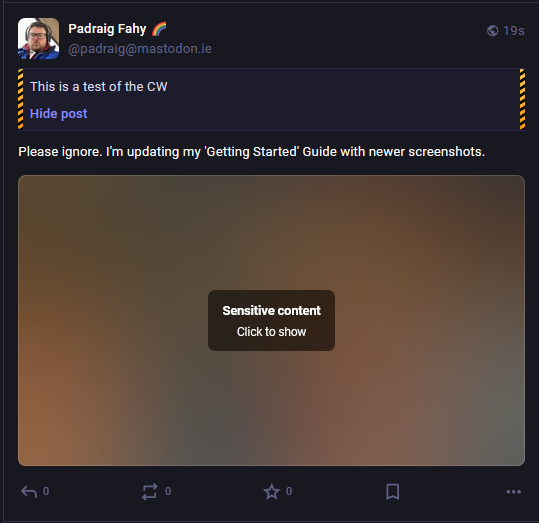
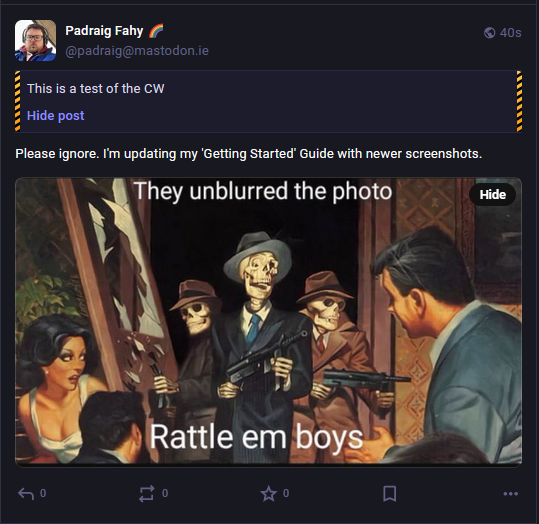
If you wish, you can adjust the behaviour of this to show all Content Warning posts and images without having to click on anything.
Go into ‘Preferences’ >> ‘Appearance’ and at the bottom, you will find the option:

“Need someone to follow? 🤔”
If you would like to get more Mastodon and other Fediverse-related content, you can follow me by clicking here.
Sharing on Mastodon
You can share posts in a couple of different ways:
- Boosting posts – As most people reading this are coming over from Twitter, this is the same as retweeting. It will place a post on the timeline stating that you boosted a post and your avatar will be displayed alongside the original poster.

- Copying a link of the post – If you see a post, you can click on the … menu on that post and clicking on “Copy link to post” and it will place a direct link in your clipboard. You can then paste that directly into your own post.

- If you are sent a link to a Fediverse post, when Boosting, you will be asked to enter your own server address. When you enter your server address, it will open that post within your server, so you can reply, boost, favourite the post.

- Embedding – If you use a CMS like Ghost or WordPress, embedding can simply be done by copying a link to the person’s post, and pasting it straight into your post on a CMS.
For websites that are not the above, you can embed a post. Click the … menu beside a post and choose “Embed”, copy the code and paste it into your page.
Q: What about Quoting, is there similar to Quote Tweeting?
A: On Mastodon web clients and official apps, quoting is not available yet. It is on their roadmap, but I wouldn’t be waiting around.
In saying that, the technology for quoting is already there! If you look at the ‘Accessing Mastodon’ section: Mona, Ivory and Phanpy have quoting enabled.
It will look like a traditional quoted post similar to what you would see on Twitter, but to Mastodon Web/iOS/Android users, they would see your quote and a link to the post.
Managing content on Mastodon
On Mastodon, you have a lot of control over what you see on the platform and you can fine-tune it to your liking.
Now, server admins will block some other servers that are problematic or don’t align with the values of the home server. Unfortunately, you will not be able to follow or interact with users on those servers and vice versa.
If you encounter a user or even a server you do not like, you can block the user or the entire server. This will not affect other users. Server admins should be contacted, alerting them to the problematic server so it can be banned server-wide.
To block someone or an entire domain, click on the user’s profile and click on the … menu and click on ‘Block @user’ or ‘Block domain <server URL>’
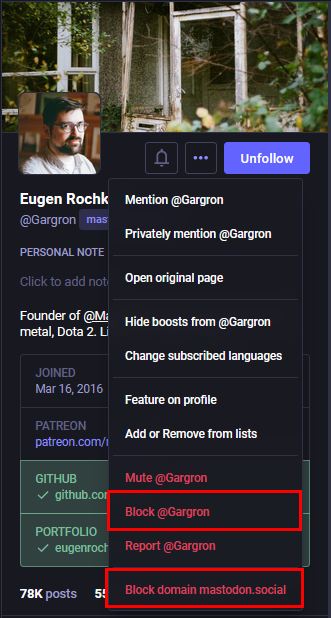
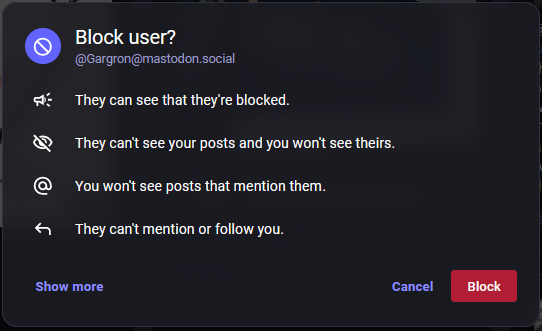
Clicking on “Block @user” will provide a prompt as to what will happen when you choose to block someone.
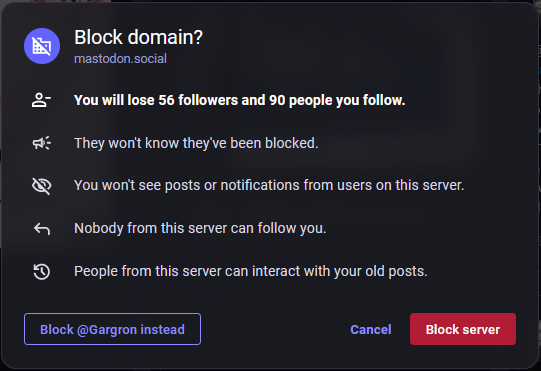
Clicking on “Block domain <server>” will provide a prompt as to what will happen including how many followers you will lose and how many people will you no longer be following. In this example, this would mean that no one on mastodon.social could see my profile, follow me or interact with me (and vice versa) – If you just wanted to block the user, they provide you with a handy button to do so.
Muting
If you are in a thread and there is too much ‘noise’ from people liking, boosting or replying to your post, you can mute it. 🔇 This means that you do not get any notifications about the post. Go to the post, click on the … menu and choose ‘Mute Conversation’
Filters
Filters allow you to hide or outright remove certain phrases, topics, hashtags and more from your feeds.
You can have multiple filters set up at any one time with various options (ie. which feed it affects, whether they expire after X amount of time or whether you want certain topics to be hidden completely or be able to click to read it (like a CW))
At present, it is not possible to share filter lists/blocks with others, but it is a hotly requested feature. Hopefully it will be available one day.
To access filters, go to ⚙️Preferences -> Filters

- Title – Set a title for the Filter list. This is for your view only.
- Expire After – You can choose when this list expires.
- Filter Contexts – You can determine which feed(s) this filter list applies to.
- Filter Action – You can choose whether filters are hidden with a warning for you to click on, or whether to hide them completely.
- Keywords or phrases – Here you can enter the phrases or keywords and whether they should match the entire word/phrase or part of it.
Accessing Mastodon.
There are multiple ways to browse Mastodon.
- Web – Simple View – This is generally the default view for all new accounts. This is one column, and you have to click on the ‘Notification’, ‘Explore’ and ‘Live Feeds’ feeds.
- Web – Advanced View – This is a multi-columned layout for power users. Users who have used TweetDeck would be familiar with this layout. Additional columns can be added, such as lists and hashtags.
- To enable ‘Advanced View’, go into ‘Preferences’. In the ‘Appearance’ section, check the box for ‘Enable advanced web interface’, and click on ‘Save Changes’. Click ‘< Back to Mastodon’ to view the new interface.
- Web – Others – There are multiple 3rd-party websites that act like a Mastodon client. Phanpy (This is what I personally use for my day-to-day use), Elk, Semaphore.
- Mobile – There are a plethora of Mastodon apps available, including the official Mastodon app, but I recommend using a 3rd-party app as the official app is missing features.
- iOS – Metatext – Best free app. Ivory is a paid app from the developers of the former Tweetbot app for Twitter. Mona is also a paid app that is also available on macOS and iPad.
- Android – Tusky is the best free app. Tooot is an alternative (I have not used this one personally, but friends and other users have claimed it’s good.)
- Desktop – If you are looking for something that is not web browser-based but an actual application, then look at Whalebird or Hyperspace
- macOS – Ivory
Federation
Federation is a term used to describe how multiple servers are connected together.
And it’s not just Mastodon ➡️ Mastodon either.
It can be Mastodon ➡️ Pleroma or Mastodon ➡️ PeerTube (A video hosting site) or eventually, it would be Mastodon ➡️ Tumblr and visa-versa.
Over time, due to interactions with other users on other servers and platforms, will it all grow. Day by day, week by week, month by month, it will keep getting bigger and bigger.
How this all happens can only be described through a diagram:

FAQ
Q: Who runs the Mastodon ‘network’?
A: Mastodon is not owned nor controlled by one entity. Each server is run independently of one another. No one can take over the entire ‘network’. It’s not possible. Each server is independently managed by either an individual or a small team.
- The non-profit Mastodon gGmbH which was established in 2019, is the company that develops the Mastodon software. They also own and operate the
mastodon.socialandmastodon.onlineservers. - The ‘Network’ is actually a protocol in the same vein as SMS or Email – Mastodon uses the ActivityPub protocol, an open, decentralised method of communication that became an official standard of the Web by the W3C back in 2018.
Q: Can I have my own Mastodon server?
A: Absolutely. If you have your own server, you can spin up your own instance of Mastodon. See here for more information.
I would personally recommend a ‘hosted’ solution, so all the leg work of setting up a server has been completed for you already.
There are different providers in the link above, but I would recommend Masto.host.
Q: Can Mastodon be ‘bought’?
A: Not in the same way that Elon Musk bought Twitter. At most, we could see the Mastodon non-profit company being sold and perhaps the IP and the development of it would change hands, but Eugen Rochko (The leading developer/CEO of Mastodon GmbH) has stated in the past that he has no interest in selling the company or the IP.
What would more than likely happen is that an individual or a group of servers can be purchased, but even still, that wouldn’t disrupt the network.
An example of this would be the acquisition of pawoo.net, Japan’s 2nd largest Mastodon server by a company called ‘Mask’ which also operates social.coop
Q: I have seen some posts that are longer than 500 characters, how is this possible?
A: Mastodon has a default character value for posts at 500 characters. Server admins can change this value as they see fit. On Pleroma (Alternative software), the default character limit is 5000. Users may be using tools and plugins to post large posts.
- An example of this would be WordPress using the ActivityPub plugin, which allows users to post full-length blog posts on the Fediverse.
Q: I have seen Meta has Threads, and they are doing something with the Fediverse too?
A: Yes. Meta’s Instagram team has released Threads, their answer to Twitter. Before the release of Threads, they had the idea of the Fediverse in mind. While the platform is available in most countries, the ‘Federation’ aspect is still in development and has a lot of hoops to jump through before they make it available to everyone.
Given Meta’s history regarding data security and business practises, many different Fediverse servers (Not just Mastodon servers) have signed an Anti-Meta Pact to block threads.net from being Federated. This means that the users on Threads and the server that blocked Threads cannot interact with each other.
Larger servers like m.s have not blocked Threads.
🇺🇸
Did you know? Truth Social, the social network platform that is owned by former United States President, Donald Trump, is technically a Fediverse server.
They are using a spin-off of Mastodon, but they have turned off Federation so that posts and accounts from outside the platform won’t be able to get in, and posts made on there won’t be able to get out.
Realistically, they could turn on Federation, but that might be a bit of a headache for their moderation team and for other server admins.
Additional Resources
- Fedi.tips – More, detailed information.
- Awesome Mastodon – Curated list of Mastodon-related stuff!
* This is based on mastodon.social's settings. Other servers may have more or less but that decision is down to the server admin.
** Favourites do not amplify the post in any way. It is just a notification that you can send to the author of the post telling them that you like it.
- Thank you for reading. I appreciate everyone who has read this starter guide for Mastodon. I hope to make more long form tutorials in the future.
- I do not take any donations or tips, so please donate to your server where possible or support the developers of the software (Mastodon, Sharkey, Lemmy, etc)
