This has been superseded by the Ghost 5 install guide:
Ghost 4 was released earlier today which brought some nice new features, mainly a way for you to easily create a subscription for your content.
Note: I am not an expert in Docker, npm, node.js or related technologies. What I am documenting here is what worked for myself.
Pre-requisites
- Plesk Obsidian – (Version: 18.0.35 is the version I had installed when I did this)
- Docker extension – (I believe this is already preinstalled, correct me on Twitter if I am wrong)
Installing Ghost!
- Go to “Docker”
- In the search box, type in “Ghost” and press enter.

- You will see “ghost” with the [OFFICIAL] tag. Click on the highlighted arrow and choose the latest version (This may say
4.0.0or similar. Do not chooselatestor4.x.x-alpine) - This will download the image and bring you to the next screen
Configuring Ghost Docker Container! (😨)
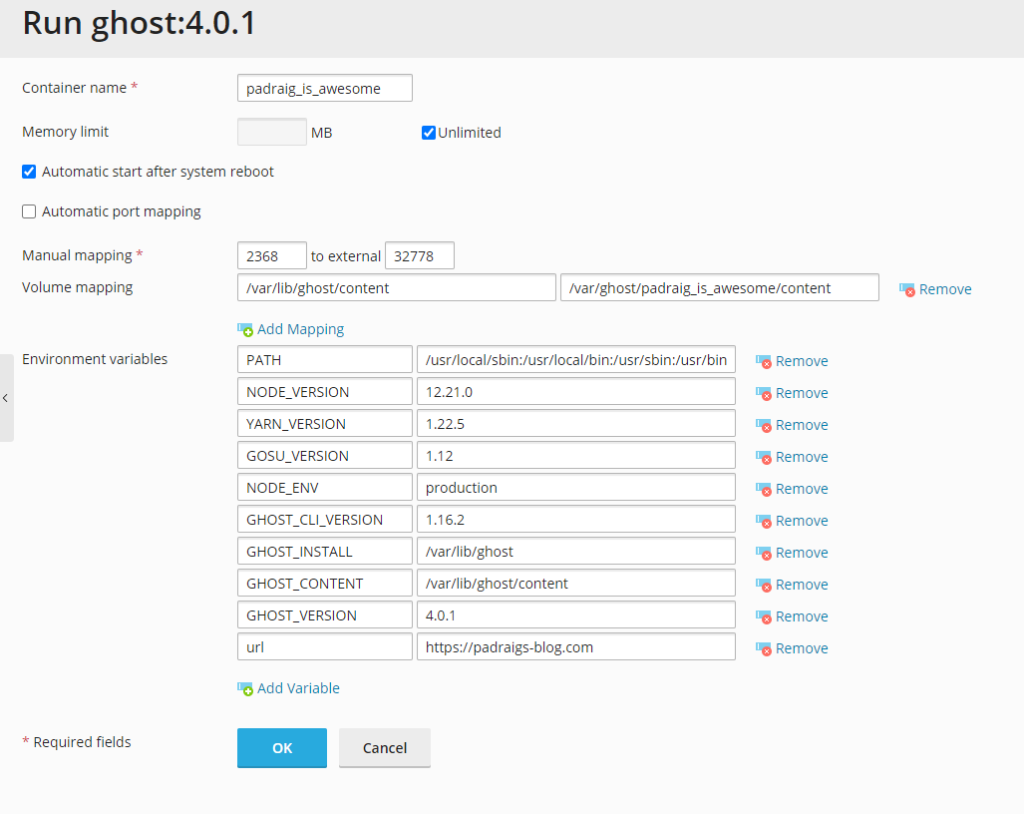
This is the probably the most important part, so please follow things to a T here!
- Container Name: Call this whatever you want, ideally something relating to your site. For this example, we’re calling this
padraig_is_awesome - Check the box for ✅ “Automatic start after system reboot”
- Un-check the box for “Automatic port mapping”
- Manual mapping:
2368to external32778
- Manual mapping:
- Volume mapping:
- “Container“:
/var/lib/ghost/content - “Host”:
/var/ghost/padraig_is_awesome/content(replacepadraig_is_awesomewith your container name at the top of the page!
- “Container“:
- Near the bottom of the page, click on “Add Variable”
- In the blank boxes above, type
urlin the first box and your URL (eg:https://padraigs-blog.comin the second box (Make sure this domain is registered, and added to Plesk)
Your screen should look very similar to this:
- Now, click “OK” and let it install.
- Go back to “Websites & Domains” and find your site, click on “Docker Proxy Rules”
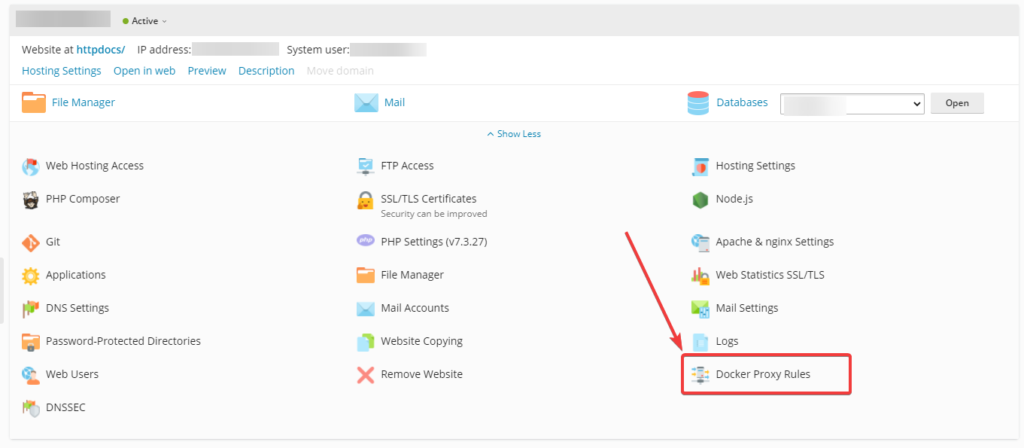
- Click “Add Rule”
- URL: Leave this alone
- Container: Choose your container
- Port: This should say
2368 -> 32778 - Click “OK“
- Give that a couple of minutes for it to work and you can access your site via
https://padraigs-blog.com/ghost(Obviously replacepadraigs-blog.comwith your own domain name)
And you should be good to go!
Frequently Asked Questions!
What if I want to run a 2nd or 3rd Ghost blog on Plesk?
Repeat the steps above, the only things to change are:
- The “Container Name”
- The port, change it from
32778to32779.- Keep incrementing this by 1 for each new blog your create!
What if I want it at domain.com/blog?
- Indicate this in the
urlon the setup page. - And when you add in the rule on the “Docker Proxy Rules” page, add
blogwhere it says “URL”.
I want to move this to/from a subdomain to a naked domain?
- Go into the “Docker Proxy Rules” and remove the rule from here.
- Go into “Docker” on the left-hand side, click on “Settings” beside the container and adjust the
urlin here. This will more than likely restart the container. - Re-add the “Docker Proxy Rules” to the new subdomain or naked domain.
How do I access the files if I want to import themes or other content?
- Connect via SSH to your server (FTP will not work)
- Navigate to
/var/ghost/$containername/content
If there are any other questions, hit me up on Twitter and I will try to help where possible, but as mentioned, I am not an expert! Do not rely on me to resolve your issue. Try StackOverflow, Plesk’s forums, Ghost’s forums, Google, DuckDuckGo.